Rice Kheer Recipe By The Spicy Trail | Chawal Ki Kheer | Eid Dessert |
Indulge in the rich flavors of a beloved dessert from India and Pakistan, Rice Kheer. This traditional delicacy holds a special place in the hearts and taste buds of many, with its creamy texture and aromatic essence. In this blog post, we embark on a culinary journey to explore the secrets behind creating this delightful treat. From the careful selection of ingredients to the artful blending of spices, join us as we unravel the essence of Rice Kheer, an iconic dessert that brings joy and sweetness to festive occasions.
Kheer, a popular dessert in many South Asian cuisines, has its origins deeply rooted in ancient history. The exact origin of kheer is debatable, but it is believed to have originated in the Indian subcontinent thousands of years ago. The word “kheer” is derived from the Sanskrit term “Ksheer,” which translates to “milk.”
Over time, different variations of kheer emerged across different regions. While rice kheer is perhaps the most well-known variety, kheer can also be made using other ingredients such as vermicelli, sago, or even fruits like mangoes. Each variation brings its own unique twist and flavors to this beloved dessert.
Today, kheer continues to be a cherished dessert, served on various occasions like weddings, festivals, and special family gatherings. Its creamy and comforting nature, combined with the essence of fragrant spices, makes kheer an enduring favorite that has been passed down through generations, celebrating the rich culinary heritage of the Indian subcontinent.
Ingredients
Instructions
- In a small bowl, take 1/2 cup of rice and soak them for 1 hour.

- After soaking, drain the water and transfer the rice to a blender. Grind them into a coarse paste.

- In a pan, take 1 liter of milk and add 2 cardamom pods. Bring the milk to a boil over medium heat.

- Once the milk comes to a boil, add the prepared rice paste into the milk.

- Lower the flame and let it cook on low heat while you prepare the caramelized sugar.

- Heat another pan and add sugar and water to it.

- Continuously stir the sugar mixture until the color changes to brown. The darker the color, the more reddish the kheer will be. For more reddish kheer, caramelize the sugar without water.

- Add this caramelized sugar to the cooking kheer, mix well, and let it cook on low heat for 5 minutes.

- Add khoya (milk solids) to the kheer and mix it in.

- Continue cooking the kheer until it reaches the desired consistency.

- Once the desired consistency is achieved, add kewra essence for a fragrant touch.

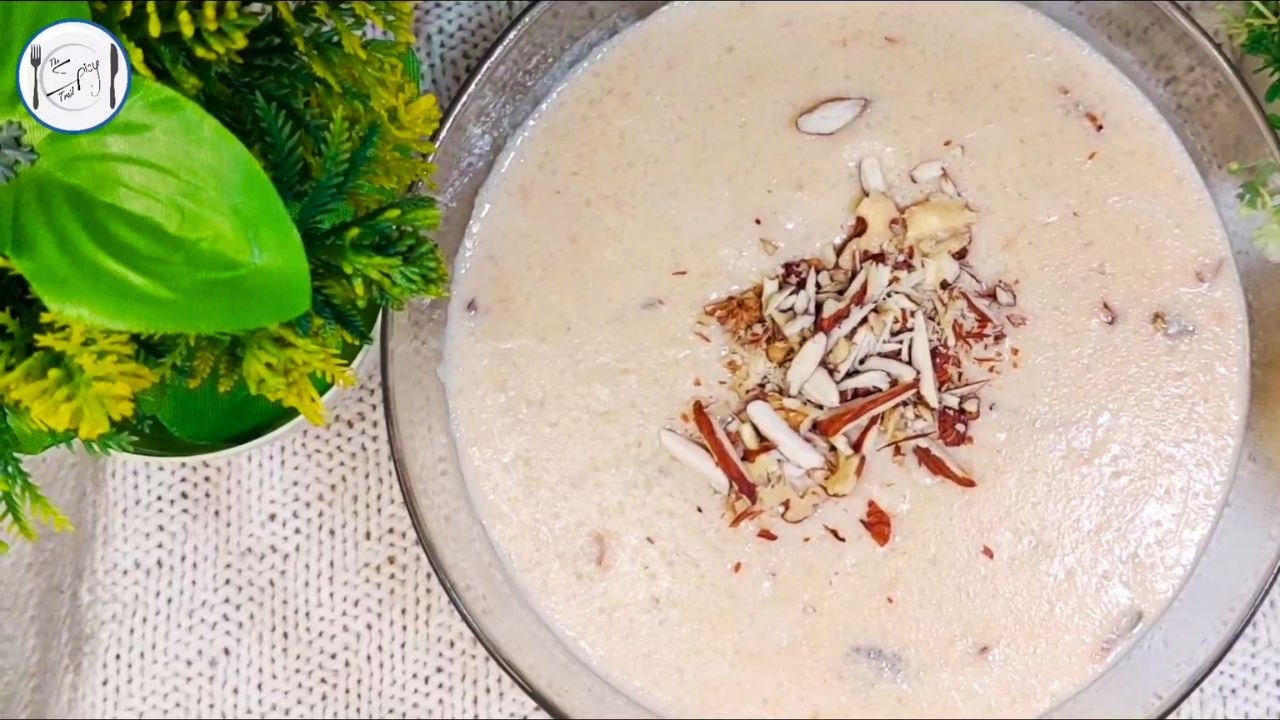
- Finally, add crushed dry fruits, mix well, and your delicious Rice Kheer is ready to be served.

Once the Rice Kheer is prepared with love and care, it is essential to serve it in a way that truly delights the senses. After allowing it to cool, refrigerate the kheer until chilled, allowing its flavors to meld and intensify. When it’s time to present this delectable dessert, consider adding a touch of elegance through proper garnishing. Sprinkle a pinch of saffron threads or crushed pistachios on top, adding vibrant colors and delightful textures. Embrace the cool, creamy indulgence of Rice Kheer, served with the perfect garnishing, as a fitting finale to a memorable meal.
Useful Tips
Here are some useful tips to keep in mind while preparing and serving Rice Kheer:
- Rice Selection: Choose a variety of rice that is suitable for kheer, such as basmati or any short-grain rice. These rice varieties tend to cook well and provide a creamy texture to the kheer.
- Soaking Rice: Soaking the rice before cooking helps in achieving a smoother texture. Soak the rice for about an hour to soften them.
- Caramelized Sugar: Be patient while caramelizing the sugar for the kheer. Stir it continuously and allow it to turn a deep brown color for a rich and slightly smoky flavor.
- Consistency Adjustment: If the kheer becomes too thick, you can add a little milk to adjust the consistency. Conversely, if it is too thin, continue cooking until desired thickness is achieved.
- Chilling Time: Rice Kheer is best served chilled, as it allows the flavors to meld and the kheer to set. Refrigerate it for a few hours or overnight before serving.
- Garnishing: Enhance the visual appeal and flavor of the kheer by garnishing it with crushed nuts like almonds, pistachios, or cashews. You can also add a sprinkle of saffron strands or rose petals for an aromatic touch.
- Serving Suggestions: Serve the chilled Rice Kheer in individual bowls or dessert glasses for an elegant presentation. Accompany it with crispy fried vermicelli or a side of warm puris for a delightful contrast in textures.
- Storage: Leftover kheer can be stored in the refrigerator for up to 2-3 days. Ensure it is stored in an airtight container to maintain its freshness.
Remember, the joy of savoring Rice Kheer lies not only in its flavors but also in the attention to detail during its preparation and presentation. Enjoy this beloved dessert with family and friends, creating sweet memories that will last a lifetime.
As you relish the delightful flavors of Rice Kheer, let it be an introduction to the vast array of culinary wonders that await your exploration. Our collection of recipes offers a treasure trove of diverse dishes that cater to various tastes and occasions. From savory delights to sweet indulgences, our repertoire of recipes promises to tantalize your taste buds and inspire your culinary adventures. So, venture forth and discover the world of flavors that we have to offer, as you embark on a journey filled with delicious discoveries. Happy cooking!


One Comment